• If you haven't done so already, please add a location to your profile. This helps when people are trying to assist you, suggest resources, etc. Thanks (Click the "X" to the top right of this message to disable it)

flutina resurrection

cass

Member
Joined
May 2, 2023
Messages
39
Reaction score
51
Location
Fircrest, WA
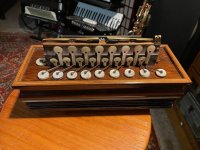
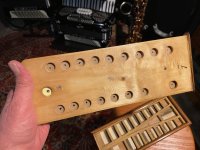
hi all. another new project. have a friend who passes on flea market accordions to me. it's fun for him and keeps me busy and learning. latest is a flutina. I know it is not technically the right name but minor point there. It is a Busson, with an 1871 date on the bellows. It is very nearly complete, missing some keys covers, one reed and a metal mesh shield for one end of the keyboard. the bellows has at least one significant hole and probably lots of smaller. cleaning it up and replacing the pads shouldn't be too bad. I have made a couple of key prototypes on my 3D printer (currently no white filament on hand). I can fluff up the interior leather seals and the leathers are mostly flat. I would prefer not to remove the keys from the axle if I don't have to, but will address that when the time comes.
If anyone who has experience with one of these instruments has words of wisdom or advice to offer, I would certainly appreciate receiving it.
thank you.

IMG_0988.jpegIMG_0987.jpegIMG_0986.jpegIMG_0985.jpegIMG_0984.jpegIMG_0983.jpegIMG_0982.jpegIMG_0981.jpegIMG_0979.jpeg
 
I'm working on one from presumably mid 1800s. It's a very advanced for its times diatonic 2.5 row & 12 bass model.

Quite exciting to experience a different, extinct branch of accordion evolution. But I see why they died out. Huge amount of labour involved in manufacturing & servicing.

What I found very interesting is that the leathers on mine were still flexible & supple despite well over 100 years of use. They were dirty as hell and potentially mouldy, so I had to throw them away. But whatever they used back in those days worked much better than the 20th century Italian stuff.
 
Was it functional? Any helpful hints on cleaning it up?
I bought a parts one since it was missing a drone linkage on the edge of the keyboard. The fun part was getting a seal on the reed pan since the deck slides onto it. It is really similar to a Wheatstone concertina in a lot of ways. As I remember I had trouble getting a seal at one end of the pan so i peeled back the leather and laid a thin 1/32nd thick strip of neoprene foam under the leather and put the leather back over it, gave it just the little bit of flex to get a good seal. I think I still have the donor instrument if you are interested.
I made my own replacement pads using a hole punch I made on the lathe to cut the right size pads.
 
Consider clarinet pads. They come in 1/2 mm increment diameters and of varying thickness. Synthetic- and these will have to be seated very carefully since Flutina key pressure is very light, or traditional bladder over felt. I tried both and eventually went with the synthetics- worked out quite well.
 
Last edited:
You're going to want to ensure that whatever pads you choose sit absolutely flat on the toneholes which in turn must be absolutely level and smooth. You can shine a light from the back of the keyboard (pulled off the instrument) to check for leaks and adjust as needed. You can bend slightly and delicately at the pad cup arms to level the pad tonehole interface. Paper shims behind the pads (within reason) are an option when close. If all the pads leak at the front they are too thick to start with, conversely, too thin. Hot glue carefully applied (to hold the pads in the cups- carefully as in just enough vice big globs oozing out)will allow for a "tweakable" set of the pads for final adjustments.

That's "tweakable"- not for big honking discrepancies which must be addressed though correct pad thickness Be really painstaking as you adjust things by bending if at all. The stress should all be on the arm (grasp it with a pair of parallel jaw or round nosed pliers or the parallel pliers and a bending tool (rod with a slot cut in it to take the arm)) , not the pivots, as this century and a half old flimsy to start with mechanism can easily be ruined unless you go really slow.

You may well need to carefully adjust/bend to ensure the cups are centered on the toneholes.

In leveling tone holes- to the extent needed- remember that you can always sand/grind materiel off. It's a "bit more challenging" to sand/grind material on...

Sorry for typos.

First Pic "What it looks like with the synthetic pads on the - well I keep calling them cups as though it was a woodwind but they are of course really just falt mother of pearl discs:

Second Pic The view from the back of the keyboard- dots in the center of the pads makes it really simple to align the pads on the toneholes; more painful than you'd think looking at the keyboard from the front.
 

Attachments

  • IMG_0707.jpg
    IMG_0707.jpg
    342.3 KB · Views: 10
  • IMG_0708.jpg
    IMG_0708.jpg
    303.7 KB · Views: 10
Last edited:
thanks for all the tips. going to take it pretty slowly. not diving in so quickly as with my accordion.
 
Going slow is a really good idea.

I actually woke up at two in the morning worried that I was going to help you ruin the flutina. If you use premade pads (clarinet/flute/whatever) be sure to "dry fit them" before using any adhesive. Dry fitting means placing the pad manually under the MOP disc with naught but the pressure of the arm itself holding it down and ensuring that it fits flush all around. The same applies if you choose to use punched out discs of the napped leather/felt material which is used on accordion pallets.

A big advantage to woodwind pads is the precisely sized round pads and the fact that they are made with a hard flat designed to be glued backing. No worries about the smoothness/ complete flatness of the MOP discs.

If the thickness is wrong- bite the bullet and get the correct thickness.

Also check for irregularities in the hole edge seating area at this point. These simply have to be right to get good results.

When selecting an adhesive make tripley sure that you can separate the new pads from the pearl should you wish/need to- probably using a razor blade. The MOP is pretty brittle and doesn't appreciate a lot of heat.

Not usually the first choice (or the second) for modern -early twentieth century on- but useable here is the clear silicone adhesive (pretty much a dead ringer for the caulk used around sinks). It sticks more than well enough in this light duty application, accomodates slight irregularities well (dry fit, dollop of adhesive on back, place on tone hole under spring loaded MOP disc and arm, wipe up any ooze with your finger, CHECK with a flashlight from the backside for leaks and for alignment, let it set, and voila).

And if you do this... did I mention to go slow and do nothing irreversible?
 
Last edited:
hey Henry d. thanks for the additional tips. was thinking about making a punch out of old pipe and cutting pads from some felt/leather that I have. clarinet pads sound like a better option to address several issues at once. I have some silicone adhesive that I tried to use as caulk. will vouch for the sticky part. recommend against using for caulk on anything. PITA.
should have complimented you on photos you attached. I doubt I will be able to make this flutina look as nice as yours but I'm trying.
no worries about the slow and reversible process on my end.
 
One source for pads- where I used to go back when I was actively repairing/ overhauling woodwinds. I'm sure there are other sources out there.


The synthetics have a smooth sturdy back. Regular clarinet pads also have a cardboard back but since the skin is wrapped around it they require a bit more finesse to use on a non cupped application. On a non student clarinet I'd use leather or fish/ goldbeater skin (the standard) pads but they are designed to be floated in a cup on a bed of shellac. That's not what we're doing with the flutina so I made a call myself to use synthetics on my flutina. Worked well for me with minimum fuss.
 
Back
Top