• If you haven't done so already, please add a location to your profile. This helps when people are trying to assist you, suggest resources, etc. Thanks (Click the "X" to the top right of this message to disable it)
  • We're having a little contest, running until the end of March. Please feel free to enter - see the thread in the "I Did That" section of the forum. Don't be shy, have a go!

Pre-war Settimio Soprani restoration project

Rosie C

Well-known member
Site Supporter
Joined
Aug 25, 2023
Messages
839
Reaction score
1,471
Location
Cardiff, Wales
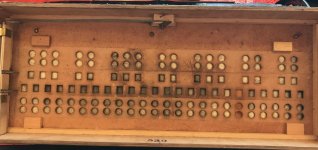
I'm making this officially day #1 of the restoration of my 1930s Settimio Soprani 120-bass. It started with a photo of my grandfather back in the 1940s. He played accordion in a dance band. With the help of the good folks here we worked out it was a "Cardinal" model, and I managed to track one down at the end of last year at the Birmingham Accordion Centre.

settimio - 1 (4).jpeg

With gorgeous tiger-pattern black keys, covered in jewels, it's quite a thing:

settimio - 3 (1).jpeg settimio - 2 (1).jpeg settimio - 1 (3).jpeg

Today I fitted straps to it, but it needs new bellows straps and the bellows themselves blow much of the air into my face when playing, it seems many of the corners are leaking. I might just stick some paper on for now, I'll probably buy new bellows later in the restoration.

settimio - 4 (1).jpeg settimio - 5 (1).jpeg settimio - 6.jpeg

But it is going to need a bit of work. As something to look back on a couple of years, here is a video of its current playability...

 
I bought some pliers and today I took a deep breath and opened up the bellows!

I don't see or smell any sign of mould, which is good! I do see dried and missing leathers on many of the reeds.
There's a wood panel above the reed bank - it looks like maybe there was an option for a third bank.
Interestingly there is "T+W / Mai / 43" - which I guess is May 1943 but in French, though I don't know whether that is a factory worker's mark, or someone repairing it later as I thought it would be late 1930s manufacture. Either way 1943 puts it in wartime France!


42953A8B-400B-4D12-BA80-9970B62580D1.jpegDF0E4E1B-D01C-4710-8611-4858435BD1B6.jpegAA041238-2E26-4B32-9A89-2D75D08D73E9.jpeg24F58876-8240-49BE-B25F-D5470FBE62D3.jpegDCA11179-2068-4864-BAB0-2E3F7AAD0D40.jpeg
 
Last edited:
Inside the treble side. It looks like the reed banks can be removed fairly easily. Again the leathers are needing attention. While the bass side was stampeded 540, the treble side is 539. There's a linkage that is connected to the palm switch under the keyboard - but it doesn't work, something jammed somewhere.

Anyway, I'm not sure why I was so nervous about splitting the bellows, it was straightforward. I'm relieved there's no mould inside, though it didn't smell like there was any when I played it.

I see a lot of glue and little leather strips in my future!

IMG_0172.jpegIMG_0170.jpegIMG_0174.jpegIMG_0175.jpegIMG_0171.jpeg
 
yes, a lot of work to come..

i will recommend you also free the bellows on the other side too,
because there is undoubtedly a LOT of flaked off dry wax floating
around in the cracks and folds. Being able to take this outside,
stretching it with paper to catch debris then brushing up into the inside folds
and hopefully gravity will help you get all the flotsam and jetsum
down to the paper for collection and composting

as you get it more and more apart, you will have a chance to clean
the inside wood surfaces too, soft brushing, maybe a small
brass brush on a stick too for metal, and once the wood is clean, my habit
to help preserve and refresh it is, i have a big ol can of johnson's Paste wax,
very soft as it has some volatiles in it, and i have a long bristled old artist
brush i use to softly coat all the unfinished wood. This layer helps resist bugs too.

the gentle fumes the wax slowly gives off will help keep the new leathers soft

you DO want to be very meticulous, but you will be removing all the reeds eventually,
at once or a bit at a time. New leathers inside y'know and fresh waxing is needed,
and you gotta put the same sides in and out as they are now

have fun !
 
Thanks for that! I'm thinking to do the main restoration over the summer university vacation. But there's time now to investigate, gather the parts I'll need.

I make it 41 keys x 3 banks of reeds x 2 valves = 246 bits of leather in the treble. It's slightly puzzling that the bass side seems to have 48 reed blocks. Anyway, that's another 96 valves! I might start with the bass side - less to do and larger pieces to work with.
 
It's a lovely period instrument. I am looking forward to your updates.

We're grateful that you are sharing with us.
 
Will be a fun project for sure. Those black keys are very sharp(or flat😀. Sorry couldn’t help it) looking!

They are. Looking closely it looks like little pieces of striped tape overlaid. But very cleverly done.
 
It's a lovely period instrument. I am looking forward to your updates.

We're grateful that you are sharing with us.

Very kind of you to say. I hope to bring it up to full playing condition, but there is much to do to get to that point!
 
I have the same model, at least I think I do ! It was my mother’s accordion. Pretty sure it’s a Cardinal model. Will have to dig it out and look. Sadly no longer plays and it’s in really poor condition now. It I just keep it for sentimental reasons.
I can remember her playing it when I was a kid, nice musette sound. My mother played in a dance band back in the forties as well. She switched to the new dangled electronic organ in the mid sixties I think. We ended up getting a Lowery Holiday organ at home. Hard to learn the piano on an organ! She did teach me the basics of the accordion though before she stopped playing it and that all came back when I switched from keys to the accordion a few years ago.
 
Last edited:
I have the same model, at least I think I do ! It was my mother’s accordion.

Thank you for sharing your story! This is all about sentimental reasons for me too - the accordion's not worth restoring from a financial point of view, but as a keen musician, I regret that I didn't really know my grandfather - I was only 6 or 7 when he passed away.
 
Perhaps the greatest step forward in the project is finding a corner in our house to set up a table for working on my accordion.
I've also found several suppliers of spare parts - http://www.cgmmusical.co.uk/ for bellows pins, https://www.stringsandboxes.de/ for bellows straps. I've also had to make some decisions over whether I'm restoring it historically accurate, or focus more on getting it playing.

My work area (the radiator is switched off)

settimio - 1.jpeg

One of the larger reed plates has a missing valve leather. But there were no bits of leather inside the accordion, so I'm guessing someone else has had it apart before me. This might explain the unholy row it makes when played - though of course many leathers are present but curled up.

settimio - 4.jpeg

None of the smaller reeds have leather valves, I'm assuming this was as designed:

settimio - 2.jpeg
 
Last edited:
More photos! I removed the treble reed banks. A lot of the leathers actually seem in fair condition, so I'll probably just replace the ones that are in bad shape:

settimio2 - 4.jpeg settimio2 - 7.jpeg

Fortunately the leathers inside the reed plates look alright - just as well as replacing them look like it would be near-impossible without de-waxing them:
settimio2 - 2.jpeg

Having removed all the reeds, I could see how the palm register shift works. A metal cover slides over the middle bank, and there's a toggle mechanism under the palm switch:

settimio2 - 3.jpeg settimio2 - 8.jpeg

Finally a close-up of some of the reeds:

settimio2 - 1.jpeg
 

Attachments

  • settimio2 - 6.jpeg
    settimio2 - 6.jpeg
    133.6 KB · Views: 8
it is amazing what will hide down in the bellows folds

if you do one reedblock at a time, you still need a big
marked cardboard to lay out the reeds and keep them sorted..

the wax all needs removed and all the leathers replaced so doing
the reeds one by one is not gonna work, and even one whole reedblock
is still a pretty big job and will take awhile, especially if you set up
to pre-tune the reeds before you wax them back in so they are all
in the same "vicinity" and will need less in place final tuning effort

have fun !
 
yeah those aluminum sliders inside the reedblocks
be very very careful not to bend or kink them at all ever

they are vulnerable compared to more modern sliders built
into the keybed
 
it is amazing what will hide down in the bellows folds

I'll have another look!

the wax all needs removed and all the leathers replaced so doing
the reeds one by one is not gonna work, and even one whole reedblock
is still a pretty big job and will take awhile, especially if you set up
to pre-tune the reeds before you wax them back in so they are all
in the same "vicinity" and will need less in place final tuning effort

have fun !

Indeed! You are right of course. Perhaps I should have started with a little single voice 26/12 accordion!

I am struggling to see how you can tune the inner reeds once the reed place it waxed into place?
 
Paul can explain that and has in some past posts.. it is
tricky and delicate but can be learned.. i am not good at it
which is why i am a big fan of pre-tuning reeds before they
are waxed back in.. if everything is "close" once they are
clean and have fresh leathers, that means final tuning is
just touch up.. and don't forget to keep the inside vs outside
of the reeds marked/noted/respected because innies have
a different "close" than the outies which he can also explain..
i just know that reeds facing the inside alters the pitch a bit
so they would be in general a slightly different "lineup" of
frequency than the outies.. rough tuning is based on where the reeds
already live, and just smoothing that out, not rigidly forcing
everything down to some frequency -0- on your tuner

i usually make a chart of each reed's comparative offset to the others
to get a feel for where they live
 
Back
Top