• If you haven't done so already, please add a location to your profile. This helps when people are trying to assist you, suggest resources, etc. Thanks (Click the "X" to the top right of this message to disable it)

Broken screw securing bass reed block/register pivot

Tor

Member
Joined
Aug 29, 2018
Messages
94
Reaction score
73
Location
Hawaii
Was looking to see if I could see anything about which reed valve was giving trouble in my accordion.  Opened it up and went as far as pulling one reed block to see a little better, a pretty simple matter, or so I thought.

Loosening one end of the reed block didn't feel sufficient to me, so I, with some force on a hand screwdriver only, it is to be admitted, loosened the other end, which is part of the mechanism that holds the bass register pivot. Unfortunately I did not have "epoxy-fixed screw" in my list of reasonably likely things to find in a good accordion I bought new and has only been tuned once by Guenadiy himself.

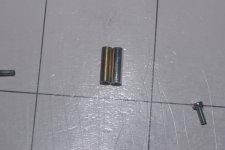
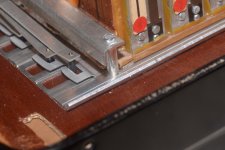
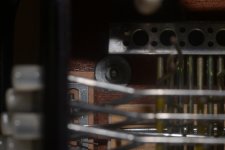
Long story short, the screw in question broke off within the brass standoff.  
Two pictures of that.

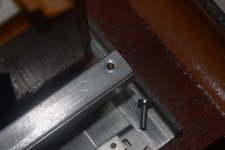
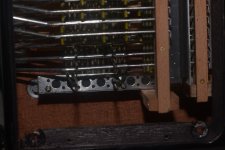
On the other side, I can't see the specific screw very well, but I have a picture of the nut for the other screw on that bar.

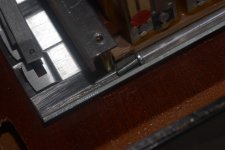
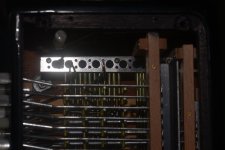
Also included are pictures of each end of the bass machine.


I'm guessing a proper repair means matching the screw, and hopefully I can get the standoff out of there, get vise grips and perhaps some solvent on it, and unscrew the remains for replacement.  Short of that, am I looking at a full bass machine disassembly to get at the other side, figure out how to remove the screw and washer - possibly putting it in my small bench mill with a long end mill, and grinding it away at the worst case to not damage the wood?

For repair, two questions:

One, what is the easiest and fastest way to get myself safe to play that won't have (probably) me furious with myself at proper repair time.  CA or epoxy the remains of the screw in place?  Other?
Two, what is the best proper fix?

Edit: Also have another accordion, an older 2/4 that needs an overhaul.  Not worth it financially/time, I know, but it's somewhat special to me, so I've been planning to make a learning project of it.  Was going to order from FRM, but he seems to have closed.  Where is the next best place to order supplies in the US?
 

Attachments

  • DSC_8990-small.jpg
    DSC_8990-small.jpg
    418.5 KB · Views: 22
  • DSC_8991-small.jpg
    DSC_8991-small.jpg
    372.6 KB · Views: 22
  • DSC_8992-small.jpg
    DSC_8992-small.jpg
    350.1 KB · Views: 22
  • DSC_8993-small.jpg
    DSC_8993-small.jpg
    387.5 KB · Views: 22
  • DSC_8994-small.jpg
    DSC_8994-small.jpg
    443.4 KB · Views: 22
Last edited:
Unfortunately I did not have "epoxy-fixed screw" in my list of reasonably likely things to find in a good accordion
Hi Tor,
Sorry to hear about your mishap.😐
Hopefully, one of our hands on repairing members will soon give us an idea of how to tackle the situation 🙂
 
  • Like
Reactions: Tor
I'm not quite sure what I'm looking at. Is the screw shown the broken one? If so, it seems strange that it must have broken deep in the standoff. Is the standoff not threaded for its whole length? What is the screw thread? Hopefully, manufacturers have by now standardised on metric threads, so this looks like it could be M4, or thereabouts.

Don't try to remove the standoff! You don't know what's happening at its deep end. It may not be easy to immobilise any fixing attaching it. And you'll make a mess of it by using pliers.

From what I can see, all the screw has to do is to attach a thin section to the standoff. It doesn't need to have a deep thread engagement. There's a lot of screw thread length left, which presumably can reach well into the standoff - so I presume the standoff is counterbored for some distance (and thus the remaining thread engages with nothing). But this seems odd. Perhaps I've misinterpreted the pix. I'd suggest that you consider installing a thread insert (Helicoil, Recoil, or a host of Oriental brands). With luck, the screw is a standard thread-form, so a correct-sized insert is available, or a similar-diameter substitution could be made. Use your milling machine to guide the drill and tap.

If you don't know about Helicoils, etc., kits are available for a huge number of thread standards and sizes, with instructions, tap, inserts, installation tool, and often the required drill being included. The hole is drilled out to the size required by the special tap provided in the kit. This will also clear out any remaining bit of broken screw, so don't go deeper than necessary. It is then tapped, and the thread insert wound in. The inserts look like springs, and are available in various lengths (1X and 1.5X the diameter being common). The tap is the same pitch as the desired thread, but a larger diameter. Thread inserts are life-savers! (But, like many good things, don't come cheap).
 
Yes, the screw shown is the broken one.  I was quite surprised when I found it wouldn't screw into anything after "loosening" it a mere one full turn.  As for threading, being a six year old Siwa and Figli I expect it probably is a standard metric, which I will verify shortly.

On inspection, the standoff is unthreaded, and the screw slides within it. The standoff itself does not rotate by the limited finger grabbing surface I can reach, although I expect that is just epoxy or whatever adhesive is also holding the nut and end of the screw.  On the nut side of the screw I can see I can see evidence of the adhesive.

I am nearly certain it is a long full-thread screw that goes through the plate, through the unthreaded standoff, through the soundboard/valve board, through a washer, and then fixed into a nut with adhesive.  That is quite plainly what the pivot screw can be expected to do by what I can more easily see than on the broken screw, and I can just barely see a similar nut under the bass rods.

Once I am into threading and fixing just to the standoff, I suspect I almost might as well just tap the standoff and use a slightly larger screw rather than a Helicoil, however for the reasons above I do not trust the standoff to take any meaningful tension.
 
OK, I understand better; I think your suspicions are likely correct. If you're right, it's pretty pathetic, from an engineering perspective, isn't it? From my limited experience of the innards of accordions, lousy engineering seems to be the Italian way - although a Victoria-made Titano I've examined was nicely done.

Two suggestions. 1. It may be possible to wiggle the stand-off (should we call it a 'spacer'?) free, if there's very little of the remaining screw in its lower end. Some careful heating works wonders for softening epoxy and thread-locker materials - perhaps a soldering iron applied to the spacer? 2. If the spacer is secure, its relatively long bore invites the use of a well-fitting drill to drill out the residual screw. Hopefully, you can avoid the expense of Helicoils... Incidentally, if you're going to do more broken-screw salvage jobs, a set of left-hand drills is useful. Often, in the middle of drilling out a broken screw remnant, the trauma of drilling causes it obligingly to unscrew!

Re thread standards. I'm puzzled by the Italian use of American threads. I thought they might be Whitworth, but now believe them to be UNC (or, possibly, ANC - there's very little difference). Grille-retaining thumbscrews seem to be 4-40 UNC, and the 'classic' bass strap adjuster thread is 10-24 UNC. Perhaps it's all a legacy of ex-American WWII stuff left in Italy...
 
it's pretty pathetic, from an engineering perspective, isn't it?
And if you think that's bad you're liable to really abhor the suggestion which follows...

Having gone through this in an older LMMH steamer trunk special I sum up the situation as follows; you have a bolt/machine screw which goes through the metal back end block bracket through a spacer through the LH foundation plate and then through a washer and into a nut. The waher and nut are "stuck" on to the obverse side of the foundation plate. "Stuck" either with glue of some sort or merely held on by virtue of the shellac painted in the area of the washer/nut to ensure a decent air seal. The spacer is also "stuck"- probably in the wame way. Not a mechanically substantial attachmnent in either case.

When the machine screw twisted off in the spacer a stub from the screw remained inside the nut at the bottom and continues to protrude through some portion of the spacer.

To fix this properly you need to twist off the spacer- probably not very difficult at all- and uncrew the stub from the nut then simply insert a new machine screw of the same thread size in the same fashon as the original and voila.

"Voila" indeed. The fly in the ointment here is that the nut on the underside of the foundation plate iw liable to break free quite easily and when it does so you'll really only be able to push the stub and the nut down into the interior of the bass machine section. You can probably fish this out pretty readily after pulling the back plate, but getting a new nut/washer tightly affixed to the end of the new machine screw through the bass machine will be a true pain... unless you pull the bass machine which is sort of the definition of a big pain somewhere or other.

You could, if accessible enough, try pushing the new machine screw through the washer and then the foundation plate from the bottom so that the head is where the end/nut was and the threaded end now projects up through the spacer and bracket with a nut being threaded on from that end. You could probably tighten that down sufficiently if there's room to get it in in the first place. Snake a paint brush in there with shellac (or nail polish) to completely seal the head/washer.

This will be equal to what you started with before it broke.

Now, if you can't get at it... the "works just fine but will cause many to cringe" solution would be to gently pull on the spacer with pliers while twisting. if the spacer comes off, leaving a decent stub- great. The stub would have to be long enough to offer some stability to the spacer when it is placed on the stub. Tap one end of the spacer for a machine screw in the thread type of your preference. Make sure that with the spacer on the stub your new machine screw has room to tighten down into the now threaded spacer- too long would probe a bit irksome.

Get some metal reinforced epoxy (quick set JB Kwik works well and is available in Hawaii) and daub it liberally on the protruding stub from the foundation plate, with a small smear inside the spacer and around the protruding stub and place the spacer over the epoxy coated stub. Wome epoxy should squeeze out- you want a good full surface bond here. Make sure that the epoxy that comes out doesn't go somewhere that causes something else not to fit- the reed block has to still insert smoothly- but remember that while you don't want to be a slob, metal reinforced epoxies are great space fillers and ... neatness doesn't count all that much. Epoxy around the spacer just adds solidity. If you ever want to pull the spacer- and I don't really see why you'd ever want to- it'll be quite the pain but such is life. When hard (several hours to set well beyond the initial five minute superficial hardening) replace the bracket, insert your new machine screw, replace the brackets, re-pin the bellows and play "Whiskey Your the Devil" three times fast as loud as you can in C# minor...

Good luck whatever path you take.

My apologies for what are almost certainly numerous syntactic/spelling howlers in the above.
 
Last edited:
Thanks for the idea about heat and how to apply it, KiwiSqueezer.  I'd considered the first part, but hadn't gotten to the second.

Well, I found the screw to be an M3x.5 thread.  My current inclination if I can get the standoff/spacer off easily is to make a replacement of the same length, thread it to M3x.5, and cut the remains of the screw I have down just enough I can expect a small gap inside.  At first impression, this would theoretically provide all the support needed, while keeping almost everything perfectly original and being relatively little work as it goes.

Thanks, Henry, I've already been considering along somewhat similar lines with an epoxy thread if I must, though, as you surmise, I dislike it for various reasons.  Hadn't thought JBWeld, but that would be better than what I have on hand.  The nut and stub have very little space before running into the bass rods, which means I probably can't back the whole thing out without removing the bass machine - and it doesn't look like a removable machine.
 
Well, I found the screw to be an M3x.5 thread.
Just a thought:
If you clear away the detritus of the original arrangement (only as much as necessary), could you find a machine bolt (and two nuts) of a suitable diameter and length ( any handy replacement would do) to fit the existing holes and string all the bits together?
If possible, install this replacement bolt facing in reverse orientation to the original and secure it with a nut.
Use a second nut as a keeper.
Locktite optional.🙂
 
  • Like
Reactions: Tor
Good question Dingo, and the answer I have thus far is that I am very reluctant to try that because I'm nearly certain trying to remove the still extant post means a full bass machine disassembly.  As I'd hoped, a pair of smooth-faced parallel jaw pliers made easy work of getting the spacer off.  The remaining post is ~.416", and the screw has ~.364" of thread remaining, so it should be straightforward to make a threaded rod connecting nut/spacer, the only tricky part being that's a long way to thread with a small tap, even in brass.  Given there's quite a bit of thread length available I might just do it in silver for easier working, especially since I don't think I have any brass of appropriate size.
 
Oh boy... that was a completely unnecessary disaster as the bolt you tried to remove should never be removed at all. The reed blocks come out by just unscrewing whatever lever is holding it in place at the other end of the block. So it isn't a matter of bad design or engineering, but user error trying to unscrew a bolt that was secured so it would never come out because it should never come out.
That said I'm afraid the solution is to get access to the nut on the mechanism side, unscrew the nut, then try to get the half-bolt out.
A very small job was turned into a job of a few hours for a skilled repairer... but it can be salvaged, just with a lot of work.
 
debra said:
Oh boy... that was a completely unnecessary disaster as the bolt you tried to remove should never be removed at all.

So I seem to have learned the hard way.  Sigh.  Working on new things later at night than ideal is never a good idea.

That said, now that I have, on the basis of the commentary from some of the other fine gentlemen here, the pictured item, matching the original spacer to .003" in diameter and .0005" in length, and fully internally threaded to M3x.5, how much risk is it to playability and the longevity of the instrument to install it as a coupling nut instead of the original spacer and full-length screw?
 

Attachments

  • DSC_8998-small.jpg
    DSC_8998-small.jpg
    498.1 KB · Views: 6
Can't be stronger than the original, as there are more connections and the metal of the screw hasn't changed.  Strong enough, however, I'd like to think it will be.
 
apologies

you did not understand the original engineering, and so
the egregious mistake and damage was done

everything since suggests that you (and many others) still
do not understand the original engineering

it seems to me like a recipe for continued and compounded disaster
all these possible repair ideas

if it can be sent back to the factory for repair, do so
if it cannot, send it back whence you bought it and hope
the G. man can fix it correctly for you

in other words, my advice is cease and desist before things get much worse,
as some of these "repairs" will undoubtedly be ir-reversible, and since they will
not restore it to original engineering parameters, are doomed to failure,
thus assuring the instrument will be no longer be merely dead,
but really, most sincerely dead.
 
The forces on the snapped off machine screw were supposed to be primarily those of tension. It failed, presumably, under torsional forces.

Its job was to hold the bracket and spacer tightly against the foundation plate and to keep the reed block snug when its end was slid under the bracket. Given that the reed block should be sung, but absolutely not "jammed down" against the foundation, that's a pretty light load.

The bracket, and by extension the failed screw, were also expected to keep the block stable when the accordion was moved about. The static friction twixt the block and the napped foundation it was held agaist would have done virtually all of this. Were the block or bracket loose you could get a hammering effect when the accordion moved which would subject the screw/spacer to lateral forces they weren't designed for. That's essentially the case in almost all machine screws and bolts; the exert a tensional force and don't fare well against lateral forces.

Try leaving the highly spec'ed lug nut studs with loose lugnuts and see how they do when the force goes from holding the wheel against the hub to getting hammered laterally as you tool on down the road. They can also be twisted off with torsion, but they hold up fine against huge forces when properly snugge down.

You might glance at the other end of the bracket and satisfy yourself via gentle back and forth on the bracket, that the bracket is not free to move.

Given that you appear to have basically twisted the machine screw off- and these are by and large pretty basic metal with none of the "grade 8" specs one might encounter in working with bolts in varied applications- the explanation of the failure is readilly apparent and no surprise. The original assembly might well have included some thread lock to keep this "not to be removed under normal circumstances" screw in place which would have made the scres essentially unremovable without real care.

Again, good luck. Your solution, if you can get it in place, looks like it'll work fine.

"Since they will not restore it to original engineering parameters, <they> are doomed to failure, thus assuring the instrument will be no longer be merely dead,but really, most sincerely dead."

We are not in OZ and there is no aspect of this particular bit of engineering that is remotely complex. Clusimess caused by a lack of familiarity with the use of handtools is an issue- but none of this is more than tedious- and not so very much of that. If it's an exceptionally valuable instrument- take it to someone who can fix it- but lets not paint it as a titanic struggle against mysterious and complex design parameters.
 
Last edited:
Ventura, I know as well as anyone that many of the options suggested were suboptimal to unwise at best - hence taking the trouble to look for advice from those who know what they are doing to get back up and playing.  At this point, if you wish to convince me that I am about to do egregious harm, please address the solution I am currently implementing: a replacement spacer/standoff threaded to match the original screw and machined in the non-bearing diameter to within .003" and in bearing length holding the reed blocks to .0005".  This will screw onto the remaining 7/16" of remaining original screw and receive ~5/16" of thread from the head end of the original screw.

You might also want to attempt to explain what force is involved that would make 5/16" of M3x.5 threaded .925Ag insufficient to the task of holding the tension demanded of it.

Thank you, Henry.  Agreed the failure mode is well-known, borne of being just tired enough to not stop and consider how much force I was exerting on a small screw I believed to be simply threaded into a nut or threaded insert. It was discomfort with how much force I needed to exert on the reed block that had to be removed first that led to me attempting to force the screw.  The failure, as you point out, is a simple matter of gradually increasing torsion until I found the first yield point of the screw.  It seems unlikely to me that any other part of the screw will have exceeded elastic deformation.

I certainly haven't thought of any reason my implemented solution is either unlikely to hold or likely to be of great difficulty to remove in the event a future proper replacement becomes necessary.  Given I've already gotten to this point and have this thread going, it seemed prudent to give people more familiar with accordion repair the opportunity to point out potential issues and to record it for those who come later.
 
I certainly haven't thought of any reason my implemented solution is either unlikely to hold or likely to be of great difficulty to remove in the event a future proper replacement becomes necessary.
I agree: your proposed solution seems entirely satisfactory!🙂
Similar to a plaster cast on a broken leg!🙂
 
  • Like
Reactions: Tor
Well, my threaded spacer installed slick as can be after taking fifteen thou off the screw for clearance, held a nice, solid tension on the screw, and looks as clean as if it had always been there, with only it being silver instead of brass to show the change to an eye that knows intimately what metal the factory used.  Closed the instrument up and it plays just as well as it did before.

Thank you to all who provided helpful commentary.
 

Attachments

  • DSC_9003-small.jpg
    DSC_9003-small.jpg
    370.7 KB · Views: 8
Back
Top