Keelbolt
Member
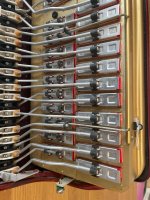
What is the adjustment screw at the base of each key designed to adjust, please? (See picture of screws in base of keys - far left of image)
I've fitted new pads to my Hohner Virtuola iii and fixed the reed valves that were curled out. It's 'almost' cured the notes that were sounding when the bellows were moved and from an unplayable instrument, it's gone to one that sounds damn good. I'm pretty delighted with the outcome, but need to make small adjustments to the pads to get rid of the last little bit of wheeze (top C# and D# leaking just a little). I'd really like to know what the adjustment screws are designed to achieve.... could someone please advise?
Thank you in advance
Richard