• If you haven't done so already, please add a location to your profile. This helps when people are trying to assist you, suggest resources, etc. Thanks (Click the "X" to the top right of this message to disable it)

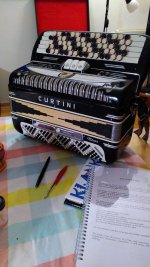
Repairing an old Curtini CBA

just a quick update on a slow process... Have spent time furnishing the workspace, is to my liking now.
It may not be the most efficient way but I like the diy approach... two ideas I think may work:
- for melting the wax i will try a baby bottle warmer. These are designed to warm up stuff 'au bain marie'; and can be set to keep a specific temperature up to 80 degrees. Got one from our local marketplace for nearly nothing, good for trying out
- an easy way to check if the new felt/leather closes off the valves properly: with the valves open and the pallets in position, check the underside with a bright light on the top side, see if any light peeps through.
 
First result 🙂 The Curtini is up and working again.
The pallets have new felt+leather and it seems airtight.
Today i glued the pallets with wax using a soldering iron at lowest setting. I was advised to do each pallet in two steps: first melt a bit of wax to make a bed for the rod; align the pallet correctly and then fill up with wax. The advice made sense to me and it worked well.
The buttons are reasonably level except for two. When i get one of those bending tools that must be addressed.

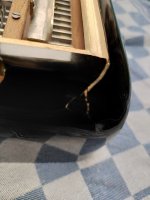
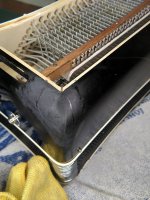
Part two of the job is the crack in the bottom. Luckily it does not affect the usability. But getting the structure more secure and learning to handle celluloid are nice challenges.
 

Attachments

  • IMG-20241030-WA0006.jpeg
    IMG-20241030-WA0006.jpeg
    272.7 KB · Views: 7
Niels, have you found the 'Accordion Revival' web site? George Bachich provides a wealth of advice there about setting up keyboards (and most other things, too). Much better than 'Accordion Repairs Made Easy' or 'The Ins and Outs of the Accordion', both of which can be found as downloadable .pdf files, if you search hard enough, and take the risk of downloading possibly copyrighted material.
KiwiSqueezer, thank you for making me aware of 'The ins and outs of the accordion'. I think it is a brilliant book.
 
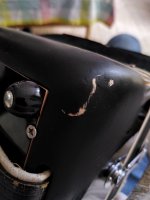
1000229976.jpgthis is the cracked corner. I think I located the exact spot where it was dented. My plan is to push that back out into its original shape and superglue it.
It would be more accessible with the bass mechanism removed but that is one bridge too far for now....
If this has worked, will try and patch up the celluloid.
 
Succes #2 The bottom is structurally sound now.
My idea of pushing the material back into shape did not work well, the crack would not close tight enough.
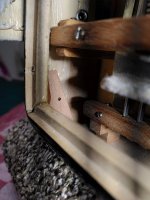
I decided to go and ask advice to an old friend from highschool who had become a furniture maker. He did give me advice, and then he did his woodworking magic and shaped two corner pieces that fit those odd shaped corners. These were glued in and after a night of drying the corners are rock solid again.

Next job, celluloid..
1000230012.jpg
 
...

Next job, celluloid..
The corner has been fixed very nicely. Now, for the celluloid you need to get hold of a (scrap) piece of black celluloid and pure acetone. Celluloid dissolves in acetone and the combination turns into a paste you can rub in and around the cracked area. It helps to rub the area with some acetone before putting on the paste because the acetone will soften the old celluloid and the paste will merge with the celluloid better. The repaired celluloid needs to dry for about 24 hours before you try sanding. Use circular motions and not too much force. Avoid putting heat into the celluloid because you don't want to start a fire. It is likely that you need to repeat the process (maybe even a few times, each cycle taking 24 hours. When the surface is smooth without pits or bumps, keep sanding with finer and finer grain and then move on to polishing with ever finer polish until you obtain a nice shine. Celluloid is not a difficult material to work with but it takes patience and a lot of time if you want the perfect result.
 
The corner has been fixed very nicely. Now, for the celluloid you need to get hold of a (scrap) piece of black celluloid and pure acetone. Celluloid dissolves in acetone and the combination turns into a paste you can rub in and around the cracked area. It helps to rub the area with some acetone before putting on the paste because the acetone will soften the old celluloid and the paste will merge with the celluloid better. The repaired celluloid needs to dry for about 24 hours before you try sanding. Use circular motions and not too much force. Avoid putting heat into the celluloid because you don't want to start a fire. It is likely that you need to repeat the process (maybe even a few times, each cycle taking 24 hours. When the surface is smooth without pits or bumps, keep sanding with finer and finer grain and then move on to polishing with ever finer polish until you obtain a nice shine. Celluloid is not a difficult material to work with but it takes patience and a lot of time if you want the perfect result.
Thank you debra! I have a piece of celluloid, will start this job coming weekend. Can you say anything about the acetone/celluloid ratio to get a good paste?
I also read about softening the celluloid into a malleable sheet, what would that be useful for?
 
Back
Top