• If you haven't done so already, please add a location to your profile. This helps when people are trying to assist you, suggest resources, etc. Thanks (Click the "X" to the top right of this message to disable it)

Thoughts?

Is this bad or not?

  • Yes

    Votes: 0 0.0%
  • No

    Votes: 1 16.7%
  • Sinful!

    Votes: 0 0.0%
  • Fine

    Votes: 5 83.3%
  • Not to bad

    Votes: 0 0.0%

  • Total voters
    6

KaiDC

Member
Joined
May 7, 2024
Messages
36
Reaction score
27
Location
Lincoln
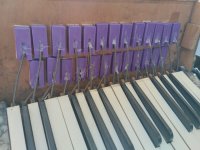
I'm a teenager who bought a terrible, old, seemingly impossible to find Stanelli accordion and I am 'restoring' it with very very abnormal methods in my opinion. I don't have much money. The accordion itself was 28 pounds. However I own a 3d printer (2) and I have replaced the old valve things with 3d printed replacements which I designed. I use hot glue. Which again is probably a very bad thing to do, I'm not sure. I am 3d printing a front panel which I designed for it at the minute because it is missing one. As I said, I don't have much money. I have replaced the old straps with 13 pound imitation leather straps from Amazon instead of the old things which were falling apart. Anyways, I was wondering just how bad this is to do? From what I have heard the accordion is around 100 year old17229446117633771502440470999939.jpg
 
well i am currently one of the pain in the ass proponents for
using correct materials and methods, but those old posts would not
really apply to your project or situation

first of all, good for you that you figured out some things and
used modern equipment to help you

it is likely true, however, that you will be the last person on earth to
ever work on this particular accordion, so as long as you are
careful and conservative with chemicals or substitute materials
(that could do irrevocable damage) go for it

your Stanelli is very very old.. the thin wire linkage for the key arms..
so yes, the type of materials used to cover it and make the buttons
and such are likely not highly stable or resistant to chemicals and
could have reactions.. many things from that era are vulnerable to
UV light radiation too, so don't let it sit in a sunny window too much..

and try to always test small inconspicuous spots first

to clean the bass buttons, a fairly benign compound can
be found in your moms gel-type dishwasher soap
(liquid Cascade and similar)
as it contains no harsh chemicals (mostly a surfectant and some clay
component) which can be used on like a q-tip of cloth to hopefully
loosen the stain/discoloration and polish the surface a bit

having a bit of very clean water can help.. do you have a de-humidifier
in the house of can you catch the condensation off the air conditioner
cleanly ? that type of water is very low in TDS and so is a good cleaner..
put one or two small drops of liquid chlorine in the water storage bottle
to keep it bacteria free

there are other polishing compounds used for plastic headlamps and
stronger types for faded auto painted surfaces.. you might find some
paste type silver polish in the cupboard too

good luck and have fun and if it accidentally dies, don't be
too sad.. this is a learning experience.. and if it survives and
works and is playable when you are finished, hooray !

now what kind of glue will hold leather valves on those
3d printed valve footers ? it has to be something that will
not migrate through the leather through to the gasketing surface
Thankyou. I wasn't expecting to get much good advice but you have been very helpful. The wires seemed to have rusted from the glue used on them. The maker hasn't got leather on the old valve footers? I think that's what you called them. It has some sort of white fabric so I used the most sort of chemical free glue I could find that was quick drying and it worked fine. I bought it off of eBay and it seems to have sat in an old attic for years upon years. Because of this the bellows seem to be falling apart slightly. Is there anything I can replace? Or should I try and replace the whole bellows? Thankyou again
 
More power to your elbow!
Without you, the accordion would be no more.
If it never plays another tune, it will have started you learning a whole bunch of new skills and the addiction will be untreatable.
 
More power to your elbow!
Without you, the accordion would be no more.
If it never plays another tune, it will have started you learning a whole bunch of new skills and the addiction will be untreatable.
Hahaa thankyou. My main instrument is the piano, but it's just to boring for me. I love it but I needed something new. And i love engineering, so when I saw the accordion on eBay i bought it straight away and I'm very happy with it even if it's falling apart.
 
Thankyou. I wasn't expecting to get much good advice but you have been very helpful. The wires seemed to have rusted from the glue used on them. The maker hasn't got leather on the old valve footers?
well generally you have a layer of felt then a leather/suede face to act
as the actual air-valve opening and closing/sealing against the hole leading to
the reed, but on some very old wood footer valves it is just a layer of leather..
if all you saw was the white stuff, possible all the leathers fell off long ago
and just were not around for you to see

for bellows, that is a whole other can of worms.. obviously it needs
to flex.. just as ob old stuff that has become stiff and groans/crackles when
flexed is near end-of-life.. but re-lining bellows with new tape
(or, ok, suitable ribbon found in the yearly rummage sale at the church)
is not that hard to learn to do

the killer though are those inverted specially folded corners made
from kid-skin.. are they stiff or do they have some life left ?
are there any actual holes or cracks in them ?

a better person than me can actually replace them.. they are available
as a repair part

and of course the two bellows gaskets themselves.. you might find
some suitable/similar thickness weatherstripping foam tape you
could cut down, or thick but very supple leather you can cut a continuous
strip out of.. silicone caulk is NOT suitable (that WOULD be a sin)
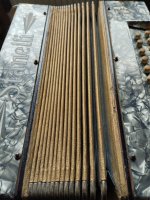
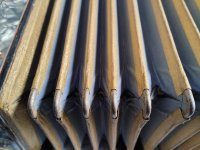
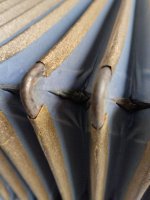
Ah ok I see, the corners of my bellows have a sort of metal thing, I don't know how to describe it. I'll attach some pictures of the bellows as I'm not sure they're the same. I will have a look at getting some leather pads for the valve footing things. Thankyou for the help17229494424344002151961431206964.jpg17229495732341775096585528786363.jpg17229495941784527772103116604402.jpg
 
Ah ok I see, the corners of my bellows have a sort of metal thing, I don't know how to describe it. I'll attach some pictures of the bellows as I'm not sure they're the same. I will have a look at getting some leather pads for the valve footing things. Thankyou for the help17229494424344002151961431206964.jpg17229495732341775096585528786363.jpg17229495941784527772103116604402.jpg
Yup, they are (not SO strangely) called “bellows corners.” Yours really don’t look too bad. You could try shining them up and removing the rust with a little steel wool or emery paper. Good luck!
 
Yup, they are (not SO strangely) called “bellows corners.” Yours really don’t look too bad. You could try shining them up and removing the rust with a little steel wool or emery paper. Good luck!
Haha, I'm very new to accordions sorry for my lack of knowledge. Thanks for the advice
 
bellows corners can become a bit loose if the cardboard under
them has dried out and lost mass.. please note they are "crimped"
into place and squeeze together the underlying material, which
is the kidskin flex stuff and cardboard.. a special tool is used that reaches
AROUND the curving outer edge to only squeeze/crimp the flat
side sections of the metal corners

if you squish the whole thing, usually that causes the corner
to develop a crack..

try making your own tools from old cheap pliers
that you can grind down so they have an overbite..
and add thin rubber/neoprene to mini curved pliers
that can hold and support a bass button while you work on it

you can see in some pics how the bellows tape has dried and lifted..
that's the stuff you replace

there are vid's on the web of how bellow's are made, and i bet
Dingo can find them for you to watch how it's done.. look
at the tools section of the parts places for shape of such things
as crimpers, pin pullers, etc.

bellows corners come in many shapes, sizes, angles.. if you end
up needing just a few some of us likely have spares to offer
 
I will have a look to see what I can do. Your advice is very helpful and I hope I can get the accordion working smoothly eventually
 
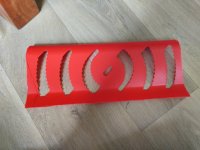
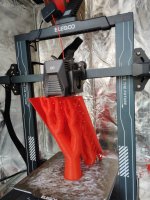
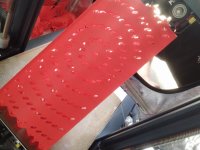
This was my first attempt at a front cover but it didn't end up working. My new attempt is around an hour and a half away from done. The tree looking sculptures you see are supports and stop the cover from printing wrong. This was the only way for it to fit on my print bed. I hope it lets enough air in. Although I'm sure this side doesn't need much air?17229513627512412030039019087041.jpg17229514069352076308034994254943.jpg17229514705978978752212982990928.jpg
 
I've seen 3d printed pallets, 3d printed pallet-to-lever linkages and 3d printed levers.
Pallets should be OK, it's just that making wooden ones is a lot easier for most people as basic woodworking tools & machinery are more common than 3d printers, at least with us oldies.
3d printed linkages or levers (seen, to my horror, in a 4k EUR instrument!), imho, is unacceptable, as plastic will become brittle and the life of such parts is rather limited. I see no benefits in using them vs the traditional methods, so why make things worse? Brass/aluminium/steel levers will outlast me.
Hot glue, the way you've done it, is fine by the way.

Bellows corners to fit an old, low radius box shape, can be bought from Aliexpress for about £4 for 50. Replacing the corners & retaping the bellows is a very time consuming job.

One thing worth noting, you are correct to start fettling with small-sized boxes, but if you really get into this I suggest you look into melodeons instead of toddler-sized accordions. Melodeons are small, simple in terms of the mechs, and very manageable for an amateur restorer. Yet, I'd argue that for a box this size, a melodeon is a much more capable instrument than a toy accordion.
Ah ok thankyou. I was just thinking I'd get something smaller to start out on and then make my way up to a more expensive, not falling apart one.
 
Back
Top